Video Tutorial: Appli-piecing the 611 Row

I promised a video tutorial on how I put the long landscape pieces of this year’s row for the 2017 Row by Row Experience.

It’s not one of my better videos, but it’s done and up, which is the important part. I had some weird formatting issues at the start, so ignore the creepy slow motion beginning, as well as my inability to look like I’m talking to the viewer. It’s been so long since I’ve done a video with my face actually on screen, that I forgot where to look!

I hope you find it useful if you decide to put the row together with turned edge applique. Handling these long landscape pieces are easily done this way. I didn’t continue the video long enough to show the machine stitching of these pieces, but I may make a follow up video showing the removal of the freezer paper and then the stitching. I did most of the pattern with turned edge applique, appli-piecing the background in my own way, followed by fusing the smaller bits.

It’s been a fun design!

Row by Row 2017

Sew Simple is busy settling into our new space and getting closer to the vision we have that will make our customers happy, inspired, and creating with needle and thread.

Row by Row 611 steam engine
Row by Row , theme: “On the Go!” We’ve got the historic 611 steaming through our fine city.

We’re super excited about participating in the Row by Row Experience for the first time. This years theme is “On the Go!”

Beginning June 21, 2017, visit any of the participating shops and receive a free pattern for a row in a quilt. Combine your rows in any way to create a unique quilt that represents the fun you had traveling to the stores. Travel with friends, discover new quilt shops and have fun collecting rows!

rxr_round_logo_png

Create a quilt using at least 8 different 2017 rows from 8 different 2017 participating RxR shops and be the first to bring it into a participating shop to win a stack of 25 fat quarters (6-1/4 yards of fabric!). Use that shop’s row in your quilt and win a bonus prize!

I designed our row in the midst of moving the shop last month. I decided on featuring the 611 steam engine as it steams through Lynchburg and past our house in small town Virginia as well. My family has some pretty big rail fans, especially the boys. We even saw this historic train get underway as it was towed to North Carolina three years ago to get restored and refitted. It fits the theme of “On the Go!” perfectly for us.

We’ve got the free pattern waiting for your visit as well as kits which include the fabrics used in my sample. There will even be a video tutorial on how I appli-piece the background fabrics together.

We’re Open!

Sew Simple is now located and operating at 2414 Wards Rd, in Lynchburg. We are sew excited about our new location, new hours, and new fabric/notions/etc. I still need to add some color to the front of the shop, don’t I? So brown. Plenty of color and excitement inside though!

Sew Simple of Lynchburg
Sew Simple at 2414 Wards Road   

We are now open Monday through Friday 10am to 6pm and Saturday 10am to 5pm. Our hope is that this will make it more convenient to visit us.


File Jun 06, 8 12 39 PM

Above is our expanded selection of precuts. Christmas fabric has begun to arrive. Row by Row starts this month and we’re participating for the first time.

Row by Row 611 steam engine
Row by Row , theme: “On the Go!” We’ve got the historic 611 steaming through our fine city.

Our carefully chosen line-up of quality Janome machines await to make sewing, quilting, and crafting so much easier, quieter, and more fun.

Sew Simple Janome machines
Just a few of our well-built Janomes.

sew simple of lynchburg

Come on in and visit, won’t you?

Getting Better to Serve You Better

We’re in the last stages of prepping our new location at 2414 Wards Road and packing up all of our fabric, machines, tools and supplies from our old location on Fort Avenue. It’s been quite a whirlwind of activity.


The new shop is easier to find for our out of town customers and in an area many of our local customers frequent. There’s great parking and night time lighting.


Inside we’ve opened up a few walls for more space, including a separate classroom and studio space for better classes. There’s a separate area for sewing machine take-in, also known as machine triage, as well as a separate workroom for machine repair and servicing.

Sew Simple panorama
A panoramic shot of the new space under construction.

I am happy to report that there is a large, clean, handicapped accessible bathroom. There’s just more space overall, which makes for a better shopping experience.


There’s still a little finish carpentry being done, followed by painting. Then we will be getting all our fabric moved in as well as adding new fabrics. Christmas fabrics are scheduled to arrive any time now! (Can you believe it’s time to start Christmas projects already?) And we are making the final touches on preparations for our first time participating in the Row by Row Experience.


I can’t wait to show you this new space!

Sew Simple is on the Move!

I am so excited to share that we’ve begun work on a new location here in Lynchburg Virginia to better serve our wonderful customers!

That’s right, we are getting ready to move. The new location is easy to find and just a hair under 1 mile away. You’ll find us open and celebrating our 1 year shop anniversary (of ownership by Amy and Eric Johnson) at 2414 Wards Road. This is somewhat across the street from Kmart and on the south side of PAWS (Pet and Aquatic Warehouse).

Sew Simple is Moving to a new location

During most of May, all will continue as normal at Sew Simple in the current location at 4900 Fort Ave. Customers will see two small disruptions in our services, beginning with temporarily not taking in any machines for service work after the 15th. We do not want to be responsible for moving customers’ machines. Beginning May 25, we will be unavailable as we make our final move of machines, fixtures, fabric and all our Sew Simple goodness to the new location at 2414 Wards Road.

We will open on June 1 at the new location for all services, including machine service and repair, as well as scissor sharpening.

The new location will give us some much needed space for our classes, customer bathroom, a repair and service center that is off of the sales floor, and more room to better serve our customers. It will also be easier to find and have better parking.

We are planning some special activities to accompany our move and will let you know more soon. To stay up to date on all of our adventures, events, new products, and more, make sure to sign up for our email newsletter. You can find a sign up widget on the home page.

How to Remove a Vintage Machine from a Cabinet

Have an older machine that needs service, but you don’t want to load it and its cabinet in the car? Don’t worry, you can take it out. See this video to see a great tip on removing it. I’ll do another the next time we get a machine in a cabinet here in the shop. Once it’s been taken out of the cabinet, usually there’s a way to unhook the electric cords and/or unplug them. Just take a peek up under the cabinet.

Need a Foot? Shank Type is Important

I see so many folks trying certain sewing techniques without the best foot for what they are doing. Your sewing is much better and more enjoyable when you have the right tool for the job. Or foot, in this case.


Here at Sew Simple we have a plethora of feet!


Not only do we have the spinning tower of Janome feet for nearly every technique you can think of, we also have a pretty good selection of feet for vintage machines. Plus, many feet can be used on other brands’ machines.


We’re pretty knowledgeable when it comes to matching up feet to machines, but there are a lot of machines out there; vintage, antique, brands with no nearby dealers….


What’s the first step to matching up a foot for one of these machines?


It’s determining the shank type.


If you’ve followed along at Amy’s blog, Amy’s Quilting Adventures, you know that she teaches two classes with Craftsy on quilting with rulers. This technique requires a special foot and with over 19,000 students enrolled in just the first class, she’s gotten pretty good at answering the shank type question.


You can read her whole post on determining shank type, though it’s primarily focused on ruler work (quilting with rulers in free motion). But here, we’ll distill it down so you have the knowledge you need to know when you come get feet for your machine at Sew Simple.


First, does your machine have a vertical bobbin and metal bobbin case or does it have a drop-in type bobbin? Next, we look at the actual presser foot bar (aka the shank).

how to shank type


First, remove the shank or foot from your machine. We’re going to measure from the center of the screw hole where the shank or foot attaches.


Some machines have feet that attach at this hole, while other machines have a snap-on shank and the feet are easily interchangeable. Removing whatever is attached at the screw hole makes it easier to see the measuring point.


Now lower the presser foot lever. We need the machine to be positioned like you’re ready to sew even though the foot isn’t attached.


Again, make sure the presser foot lever is down.


Now measure from the bed of the machine to the screw hole.

how to find sewing machine shank type

If the distance is 1/2 inch, you’ve got a low shank machine. (Low shank on left, high on the right)


If the distance is 1 inch, it’s a high shank machine.
low and high shank

Above is a standard low shank Janome machine on the left and my beloved Janome ruler foot combination on a high shank machine on the right.


Those are the easy machines. But there are some machines that don’t fit into these two main categories.


First there are some machines that are high shank machines, but the needle position is different than regular machines. These are the straight stitch only machines like the Janome 1600P and its clones: Brother 1500, Husqvarna Megga Quilter, Juki 2010, etc. These are considered a high special and use the same feet as the Janome 1600P. We’ve got feet for these machines.


There are some machines that fall somewhere in between high and low. These are usually Pfaffs, but not all Pfaffs are medium shanks. Before declaring your machine a medium shank, make sure the presser foot lever is in the down position. Pfaffs that use a special half-way position for free motion are considered medium shanks.


Berninas are….well, Berninas. See your Bernina dealer.


Some vintage machines have slant type shanks. They need slant type feet. We have a decent selection of these.


Additionally, most modern machines (other than those high speed 1600P types) now use a snap on shank and then the feet attach to it. You may need to look for feet that have the foot and shank as one unit, but many machines can be fitted with a modern snap on shank with makes changing feet so much easier!


Still have questions on what feet fit your machine? You can always bring it in for us to fit it with a foot or take a few pictures with your phone and bring that in.


We are happy to help your sewing be as enjoyable as possible!


We are central Virginia’s Exclusive Janome dealer and repair/service center. We also perform knowledgeable sewing machine repair on a wide range of sewing machines. We also conduct classes on a variety of sewing techniques and is the only place to learn quilting with rulers from Amy in person.

How to get Better Stitches: Mystery Issues Part 1- Thread Caps

Sometimes when sewing we get a mystery issue. You know the kind, everything looks right but every once in a while the thread tension goes off for a bit and then is fine. Or there’s a noise that catches your attention and then disappears. Or the thread breaks and after re-threading, everything is fine. Sometimes it takes re-threading a few times, changing what seems like a minor variable, and then it’s OK…maybe just for a while….


Or maybe it’s not fine and you take the machine to the dealer and they check it over, re-thread it and everything is fine. Frustrating to not have a clear cut explanation isn’t it?


Some people will pass it off as a fluke, some will blame themselves, others will blame the machine.


What follows is one in a series of posts I will be doing on some of the causes of these mystery issues. Yes, there are reasons for some of them. Sadly, these things won’t fix every mystery and sometimes the issue isn’t knowingly or permanently fixed, but this series will give you several troubleshooting steps to go through to help with these things. Sometimes you fix something without really knowing what you did.


The first one involves how your thread feeds. If the thread doesn’t feed evenly, it can cause inconsistent tension, cause the thread to jump out of the proper threading, or breakage.


First, is your thread good? Cheap thread can have tons of lint, inconsistent thickness, even slubs. Old thread gets weak, dusty (hello? dust = lint.) Sometimes even the good stuff can fail us. Maybe you got a spool that was damaged, impacted by a manufacturing issue, or something else. Is it a coated hand quilting thread? That stuff is not good for machines! Leaves a residue in the tension discs and bobbin case, plus is springy, causing twists and loops in the thread path and even in the finished stitch. Some threads are delicate and take extra care with use- special needles, a different spool pin orientation, different tension. Sometimes a rayon spool is grabbed by accident. Rayon is easily broken when used like a polyester thread. Cotton breaks easier than polyester.


I’m not saying don’t use a good rayon or a quality cotton. Heck, sometimes we can even get by with using the cheap stuff. But sometimes the thread is the issue.


Sometimes how the thread is fed off the spool is the issue.


I’m going to finish up this post with just one particular issue about how thread feeds off the spool/cone, but I’ll be writing more about some other variables in this series.


If you are using a horizontal spool pin on your machine (sideways), you need to use a spool cap.


A spool cap (sometimes called a spool holder) holds the spool or cone on the pin. These usually come in two sizes (there’s a third type I’ll talk about in a minute) and are meant to not only keep the spool from coming off the pin, but to hold the thread slightly away from the actual spool. This keeps the thread from getting snagged on the spool, especially if it’s an older spool with the notched edges and a slot cut in it for the thread end.


It’s not necessary for the spool cap to hold the thread tightly against the attached end of the spool pin. I like to let there be enough space that if the thread pulled on the spool as it unwound, that the spool could rotate. This would keep it from jerking.


Nobody likes jerks, especially your machine. In fact a jerk can cause the machine to get its thread in a wad. (If your brain substituted panties there, it’s ok.)


In our shop, we still see some vintage/older/mature/aged sewing machines. Some of these machines do have the horizontal spool pin, but may also have a separate spool cap-like piece that is meant to be on the pin before the thread is placed on it, then a spool cap to hold the thread in place like above. If this base is missing, thread might get hung up at the base of the spool pin or rub against the machine.


Obviously, if these spool caps get damaged, nicked, dirty/sticky it can cause the thread to occasionally get jerked or feed poorly. Keep them clean and in good condition.


I mentioned a third type of spool cap earlier, and now I’m going to tell you about this wonderful little Janome item. This tiny little savior of my thread collection debuted with the Skyline S5 and has come standard now with most of the newer, bigger machine models. Many people (dare I say some Janome dealers) might not realize its potential, but it can be used on nearly all Janome machines on the horizontal spool pin. It can also be used on Kenmores, Elnas, and other brands of machine. I don’t know if other brands other than Janome and probably Elna have a similar part. I order these lovely little special spool caps as a replacement part by the dozen or more.


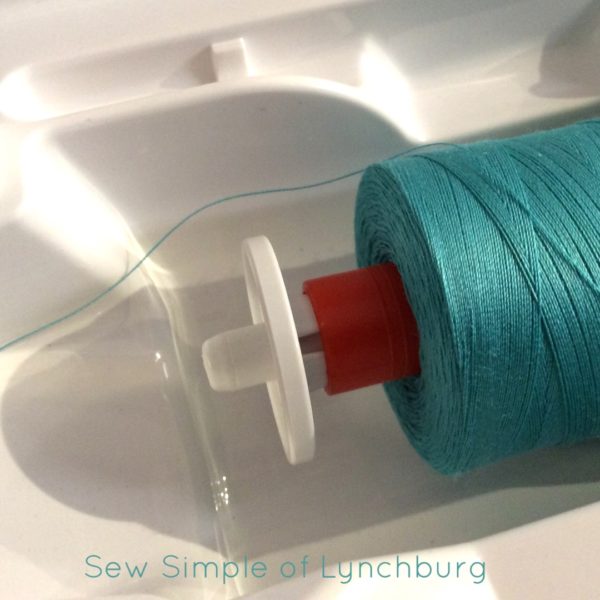
Why are they so awesome? Well, there are new threads out there that are cross-wound onto cones; my beloved Glide, Cairo Quilt, and the bigger sized Aurifil for example. These threads don’t want anything to come between the top of their cones and the machine. Maybe you’ve been doing this:
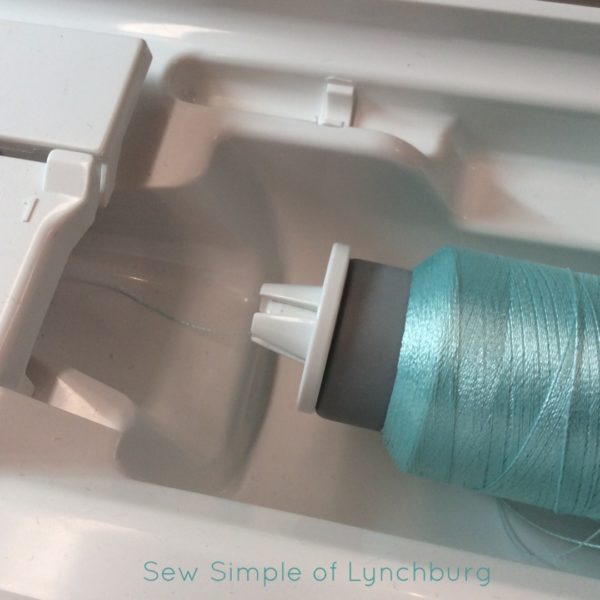
wrong spool cap for cones

Or this:

file-jan-05-8-46-17-pm

But what you need to do is this:


special-spool-cap

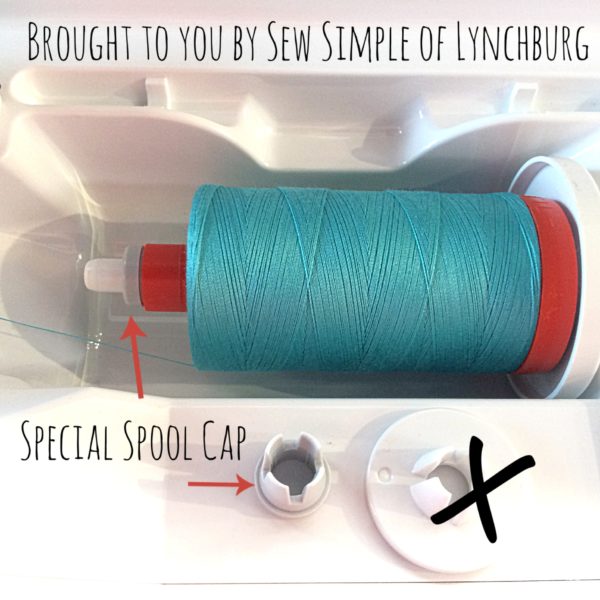
This cute little special spool cap is made just for these types of threads. As the cone gets smaller, there’s a bigger chance that the thread can loop around these other spool caps.


This is just one of many things that can solve your mystery issue. Can you get by with using the other spool caps on these types of cones? Probably. We’ve all done it from time to time, I’m sure. But it’s another thing to check when you have those intermittent mystery issues.


Spool caps are cheap. Messing up a great quilt/project or an unnecessary trip to the repairman isn’t. (BTW, if you aren’t local, we sell this special spool holder at Amy’s Quilting Adventures.)


One of the best ways to keep your machine running great is keeping it cleaned and oiled. If it’s been a while since you’ve had your sewing machine serviced, or your in need of sewing machine repair, we are happy to help you. Sew Simple has been the place to go in south-central Virginia for sewing machine repair, service, and quality Janome machine sales for nearly 30 years.

Year-end Fabric Sale

fabric sale Sew Simple of Lynchburg

It’s nearly inventory time and we’re having a sale on all fabrics. December 29-30 (Thurs. and Fri.) all fabric on bolts will be reduced by $2 per yard and all precuts will be 20% off. These are all our high quality quilting cottons and our beautiful Art Gallery denims and voile.


We will be open 10-5 both days and closed for New Year’s Eve and New Year’s Day.

Anna Maria Horner M100 Janome

We just got in the new Janome sewing machine inspired by designer, Anna Maria Horner. Take a look:

Anna Maria brings color and inspiration in the form of craft, sewing, needlework, books and friendly how-to. Since 2006, her every growing library of fabrics has delighted and adorned creative souls around the globe. Anna Maria has been the Spokesperson for Janome America since 2011. As of 2014, she is the founder and proprietor of Nashville’s Craft South store. Craft South opened the doors to its permanent location during spring 2015.

Designed by Janome’s Spokesperson Anna Maria Horner, the AMH M100 is a beautiful answer for the maker who wants to create custom garments and home decor. The AMH M100 includes all of Anna Maria’s favorite features and accessories for her everyday garment sewing, patchwork and quilt making. It has a wonderful selection of 100 built-in stitches and includes cutting edge, easy convenience features that give you an essential variety for your diverse sewing needs.

Utilize the AMH M100’s built-in needle threader, snap-on presser feet, automatic thread cutter, auto-declutch bobbin winder and 7mm stitch width. These features make your sewing easier and more convenient.

My favorite feature on this style of machine is the needle-down setting, which makes the needle stop in the down position everytime. It’s like having an extra hand while sewing. The tie-off feature is pretty awesome too. Press it and the machine stitches in place 4 times, securing your line of stitching without any messy back-tacking. The backlit LCD screen with easy navigation buttons make choosing stitches a breeze. Enjoy a smooth and quiet operation while you create garments, quilts and gorgeous home decor with this great sewing machine.


Come on into the shop and check it out!